Thursday 30 July 2015

See The Minimum Requirements (Specs) For Mobile Phones To Upgrade To Windows 10 OS

Since sometime around late 2014, the talk on the Windows 10 operating system has been everywhere. Since then, there has been events upon events disclosing new features to be expected on the windows 10 OS. Of course, everyone would love to upgrade to their phone’s latest OS in other to work with new features that are introduced.
Just before we go into the minimum requirements in terms specifications required for mobile devices to upgrade to windows 10, It would only be nice to state that the Windows 10 operating system went live yesterday for PCs (Personal Computers). Hence, if your PC meets the requirement for windows 10, it would be in your best interest to upgrade the earliest you can.
For Windows Mobile users, the windows 10 OS won’t be available till sometime around November when the OS is expected to be rolled over.

Windows 10 OS on mobile phones
While we are anticipating this OS release for phones running windows OS, I am sure you’d like to know the chances of your devices meeting up to the requirement and perhaps, enjoying the new OS ride.
Microsoft via Windows Central and their official website, has published the minimum requirements to which mobile devices can upgrade to windows 10. From the requirements published, it is no much different from the specs required for windows 8.1 OS. Almost every phone running Windows 8 will be able to upgrade to windows 10 when it is launched.
Minimum requirement for windows phones to run windows 10 OS
From the image above, it shows that mobile devices with display resolution of at least 800 x 480, RAM Size of 512MB, 4GB internal storage plus VGA camera will be able to upgrade to the latest OS.
Considering this minimal requirements, it is evident Microsoft is trying to put thing in place by making almost every phone running on windows OS, get the windows 10 update. That way, more OEMs will be interested in producing more devices that will run on the latest windows OS which would in-turn, result in more publicity and more money. Hmmmmmmm Nice One!
Remember that your old windows phone you had abandoned? I think it’s time you revisit it and prepare it for the big bang.
- Sources: http://www.techsng.com

How to UseEtisalat Chatpack to browse on Android and System

The etisalat chatpack is almost free but it is slow when browsing. The package is meant for chat on facebook, whatsapp, bbm, wechat and messenger.

DON_PHEZTURZ
However, you can use simple server or Psiphon
Handler to open it up and browse with it either on phone or system.
To get it going, recharge or transfer N50. to your etisalat sim.
Dial *200*3*3*1*1# to subscribe.
You will get the welcome message to etisalat chatpack. And you will also be given 10MB data for 24 hours.
You do not need money to renew it again as it auto renews without everyday without stopping.
The speed is slow but it works 24hrs after you exhaust the 10 mb.
You get messages that you have used up the data, just ignore and continue to use it.
Just set the connection settings to:
Etisalat Apn: etisalat
Proxy ip: 127.0.0.1
proxy port: 8080
To configure Simple server on phone:
Launch your SimpleAndroidServer, go to settings:
Proxy host put: 185.28.193.95
Proxy port: 8080 or 80
Inj. query/url: http://mobile.facebook.com
Inj. host: mobile.facebook.com
Inj. line : press enter key four time
log level: debug
Close settings.
Then launch Autoproxy or ProxyDroid depends on the one you use.
Go to settings and set proxy to 127.0.0.1 port 8080.
Then start simple server, once successfully started, launch autoproxy or proxydroid and connect it.
Once everything is running, you are good to go.
Best browser for this is UCweb mini as it is faster than others.
…………………………………………
To Use the Etisalat Chatpack on Pc with SS
APN: etisalat
Pri Dns: 8.8.8.8
Sec. Dns: 8.8.4.4
Edit your pc simple server like this:
LHOST = ‘ 127.0.0.1’
IMETHOD = 0
ISPLIT = 0
RHTTP = 0
TIMEOUT = 60
PHOST = 185.28.193.95
RQUERY = ”
RPATH = 0
PTYPE = 0
KEEP = ”
BQUERY = ”
MQUERY = ”
RHTTPS = 1
PPORT = 8080
LPORT = 8080
VALHDR0 = ‘ mobile.facebook.com’
VALHDR1 = ”
VALHDR2 = ”
VALHDR3 = ”
IQUERY = ‘ mobile.facebook.com’
ADMODE = 0
CQUERY = ”
CUSHDR2 = ”
CUSHDR3 = ”
CUSHDR0 = ‘Host’
CUSHDR1 = ”
ILINE = 0
FQUERY = ”
FQUERY = ”
SBUFF = 1024
RPORT = 0
Save and connect. Set your browser and download
manager to use proxy
127.0.0.1 port 8080.
NB… Download The simple server .ini file HERE.
Slow but working unlimited. I get 20 – 35KB/s i.e. 150kbps to 350kbps.
…………………………………………………..
How To Use the Etisalat Chatpack with Psiphon Handler
The settings is as below:
Download Psiphon HandlerUI for android HERE.
PSIPHON HANDLERUI settings:
Apn: etisalat
No need for ip and port
Launch Psiphon HandlerUI
Tick remove port
Proxy type: select real host
proxy server: mobile.facebook.com
and click save.
Now go to options and select region as United States.
Tick tunnel whole device.
Go to more options and open it, tick “connect through http”
also Tick “use the following setting”
Host address: 185.28.193.95
Port: 8080
That’s all. Close it.
Then connect.

Dont forget to drop ur comments and invite ur friends….

SOURCES WWW.GLTRENDS.COM

20 Naira Daily Unlimited Free Browsing on MTN with SimpleServer And AutoProxy


You must have up to 20naira on your mtn sim go to message and text OK to 7801
After the welcome message you will then
first download Android SimpleServer HERE
And install it after that
……………………………..
Go to your phone settings and locate your APN and set
Apn: web.gprs.mtnnigeria.net
Proxy: 127.0.0.1 and
Port: 8080 and save it
………………………………
Then open theSimpleServer and configure the settings:
Proxy host: 10.199.212.2
Proxy Port: 8080
Injection Method: get
Injection querry/url:
http://mtnng.appplus-sys.com/apps
Injection Host: mtnng.appplus-sys.com/apps
Injection line: press your enter key 4 times
Buffer size: 8092
concurrent connection:10
Log level: debug
After that click on the start button and start browsing and downloading.
In case your play store or ucbrowser is not opening
you will need to download Autoproxy
And your phone must be rooted before you can use autoproxy.
Download AutoProxy HERE and install
After that open it and click on the + sign and put the settings:
Proxy Host: 127.0.0.1
Proxy Port: 8080
Proxy Type: HTTP
Enable Authentication:
Tick/Mark the box
Proxy Username: web
Proxy Pa$$word: web
After that close the settings and click on: 127.0.0.1:8080
And connect and enjoy.

It’s a daily unlimited plan and you must
have20 naira before you send the code daily enjoy
SOURCES: WWW.GLTRENDS.COM

Hot- Mtn Unlimited Calls for just N30 EveryDay

in case you did not get such message.
DON_PHEZTURZ
very simple as the screen shot below..
just send this command
send-
30 to 567
you will only be charged N30 Everyday to call Anybody you like..
offer Ends on the 31st of July 2015

Download Unlimitedly On Your MTN Sim Now @ #5 Daily


With #5 you can browse and download unlimited for a week.
How?
Just text W to 5900
After the welcome message you will then
first download Android SimpleServer
And install, u can get dat from playstore….
after that
……………………………..
Go to your phone settings and locate your APN and set
Apn: web.gprs.mtnnigeria.net
Proxy: 127.0.0.1
and
Port: 8080 and save it
………………………………
Then open the SimpleServer and configure the settings:
Proxy host: 10.199.212.2
Proxy Port: 8080
Injection Method: get
Injection querry/url:
http://musicplus.mtnonline.com/?m=8PUyXNN9XqksE8DG&c=1
Injection Host: musicplus.mtnonline.com/?m=8PUyXNN9XqksE8DG&c=1
Injection line: press your enter key 4 times
Buffer size: 8092
concurrent connection:10
Log level: debug
After that click on the start button and start browsing and downloading.
In case your play store or ucbrowser is not opening you will need to download AutoProxy
And your phone must be rooted before you can use AutoProxy.
Download AutoProxy here and install
After that open it and click on the + sign and put the settings:
Proxy Host: 127.0.0.1
Proxy Port: 8080
Proxy Type: HTTP
Enable Authentication:
Tick/Mark the box
Proxy Username: web
Proxy Pa$$word: web
After that close the settings and click on: 127.0.0.1:8080
And connect and enjoy.
It’s a weekly unlimited plan. After the end of the week, it becomes #100 for another week. enjoy

sources: www.gltrends.com

Hot;- How to get free 3gb mtn


mtn Logo

— If you already tweaked the free MTN 60mb posted long time ago kindly dail *559*6# to check your 3gb

— Those that are yet to tweak theirs should use this IMEI  864981012824179 then in
SMS  “lyte” to 131  or  “Nokia” to 131

source: www.gltrends.com

How To FIX net::ERR_PROXY_CONNECTION_FAIL on Android

This post would be straight to the point on how you can easily fix the  net::ERR_PROXY_CONNECTION_FAIL error you might often get on your android device when you are trying to use applications that access the internet.
How To Fix Proxy Connection Fail Error on Android
Now this error occurs as a result of your internet configuration trying to force the application in question to use a proxy server. To eliminate this, all you need do is eliminate the forced proxy tunneling.

How To Stop PROXY CONNECTION FAIL Android Error.

If you are making use of a Wi-Fi network, all you need do is
Go to Settings > WIFI, then select the particular network you are connected to, press and hold for some seconds and click on some sort of “Disable Proxy” and that’s it.
On the other hand, if you are making use of the internet configuration provided by your service provider (APN), simply go to Settings >  Mobile Networks > Access Point Names . Now edit the Access Point Name in use and disable whatever proxy you find in it, then Save.
To be on the safe side, it is recommendable that you delete the Access Point Name and create a new APN profile without proxy server enforcement.
You can then try connecting the application back to the internet and watch thenet::ERR_PROXY_CONNECTION_FAIL error get fixed.
I hope you find this little tip helpful. Feel free to share with your friends.

Infinix HOTTest One and 2GB RAM Hot Note Are The Latest Upcoming Devices From Infinix

Earlier today, I was able to confirm the news on the upcoming Infinix HOTTest One and a 2GB RAM version of the Infinix Hot Note Android phone.

According to one of infinix’s top staff from whom I confirmed the report, The 2GB RAM Version of the Infinix hot note device will be on sale from the first week of August while the Infinix HOTTest one will be launched on the 18th of August, 2015.

The Infinix Hot Note

I understand that there’s Infinix hot note pro which features 2GB RAM and 32GB internal storage, the staff confirmed that the upcoming device is different from the hot note pro.

2GB version of infinix hot note

While the hot note pro features 2GB RAM and 32GB ROM, the upcoming Infinix hot note version features 2GB RAM and 16GB ROM. Every other thing is pretty much same with the Infinix hot note x551 including the design and battery capacity.

The Infinix HOTTest One

The Infinix HOTTest One android phone
When asked, no specification details was disclosed in regard the Infinix HOTTest One device. 

However, it was made known that the device specs will wow us. To an extent, I am convinced that the HOTTest One will be running on android lollipop OS. Chances are, it will run on a much better octa-core processor packed with 2GB RAM. 16 and 32GB internal storage versions like like we saw in the Infinix zero 2.

Please note that those specs are just mere speculations by us as no information has been given yet. So, brace up and expect the Infinix HOTTest One!

We will be giving more information in regards the device as soon as it gets to us. Infinix HOTTest one, we are waiting!

Sources: http://www.techsng.com

Tecno Upcoming Camon C5 Android Phone Will be 4G LTE Enabled

While we are still expecting news on the innjoo fire pro which promises 4G LTE connectivity, Tecno’s upcoming smartphone, debugged as Camon C5, will be 4G LTE enabled. 4G LTE connectivity basically means more browsing speed and of course, download speed.

No much specifications has been stated in regards the Tecno Camon C5, but it is rumored that the device may run on an octa-core mediatek processor packed with a 2 or 3GB RAM. The device is also rumored to run on android Lollipop operating system, 5 inch display with metal body.

Tecno Camon C5 with 4G LTE ConnectivityNo confirmation on what storage capacity the device will come packed with but we are expecting to see a 16 or 32GB internal storage space (anything less would be a disaster). We are also expecting the Tecno Camon C5 to have an 8MP camera with dual LED flash and not forgetting the 4G LTE connectivity.

Tecno Camon C5 quick specsMore teaser photos has been released via the Tecno mobile Kenya facebook page and you can see them below:

Tecno Camon C5 leaked picturesNo specific date has been disclosed as to when the device is going to be launched but you can trust that we will give you the information as soon as we get them. We will also share the full specifications as soon as it is confirmed by Tecno Mobile.

What price range will the Tecno Camon C5 be sold at? I don’t want to say one now and my Oga at the top will say another lol.
Sources: http://www.techsng.com

Infinix Phone Users Can Test Run Android Lollipop 5.1 As Public Beta Arrives

Earlier before now, we had talked on when some Infinix android phones will be getting the lollipop update. According to Infinix mobile, the android 5.0 lollipop update will be rolled over to Infinix phones by August.

In a bid to keeping up with what the company had promised, a public beta version 5.1 of the lollipop update has been introduced.

Lollipop-infinix-Hot-NoteAndroid 5.1 Lollipop on infinix hot note phones

As at now, the public beta version is available to only these Infinix devices:

Just so you know, the update is still in beta level hence, they are chances you will encounter some bugs. If you encounter any, please be sure to let us knowing the comment session.

More so, there is no guarantee to whether or not, your data will be erased when you flash in the lollipop update. Hence, it would be in your best interest to make a backup before commencing the flashing process.

For the public beta, it is required that you flash the update to your phone using SP flash tools instead of OTA update. If you’d like to learn how to use SP Flash tool in flashing a ROM to your Infinix phone, Please see this post.

For more information in regards the Infinix lollipop update for the above Infinix devices, please visit the Infinix forum here.

The timing for the official lollipop update hasn’t changed. It will be released by August and we are hoping it would be rolled over via OTA. If it is required that we download and install the update via SP flash tool when it is released, I will be here to help.

Sources: http://www.techsng.com

Tuesday 28 July 2015

How I Fixed / Repair A Bricked Infinix Hot Note X551 Android Phone

Yeppy! Finally, the infinix hot note x551 which was bricked has finally woken up from coma after about 4 days. All process completed and the device is now working fine.

If you have been following my latest posts especially those that has to do with rooting and installing cwm recovery, you would recall I made mention of my infinix hot note x551 hard-bricked. Hard-bricked in the sense that, the phone wasn’t even turning on when placed on charge even for hours. 

Following that post, I promised to publish a solution on how i fixed the device when the device starts running.

Just before we move to the solution proper, I’d like to share how it happened. Perhaps, it would come in handy for those interested.

Few days ago, I intend doing a factory reset on the phone. My aim was to factory reset the phone to its default state since I barely use the phone considering the fact that I own an iPhone, Blackberry 10 as well as the latest zero 2. Before doing a factory reset, I had to unroot it using the Kingroot app in other to avoid bricking (soft demage). Every thing worked out well and the factory reset process went smoothly.

Just when the phone had fully started up and running smoothly, an update popped up. I didn’t waste time reading the description hence I initiated the download update.

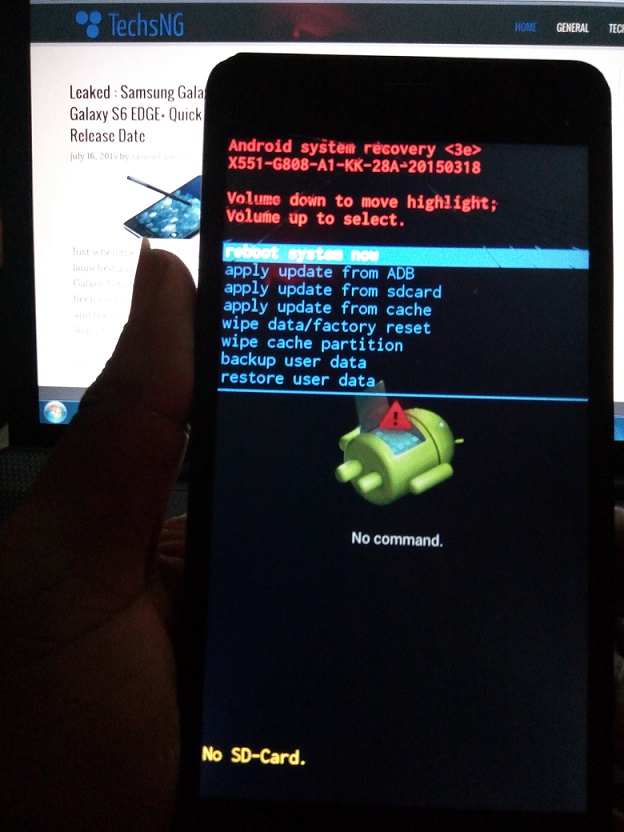
Download was complete and the phone had to restart in other to complete the update. It was during this process, the phone automatically came up with a No Command Error. Ooophs, phone bricked! At that point, the only options displayed were the once shown on the image below:

Bricked Infinix hot note X551 android phone

I had to research on how to unbrick the phone and while following a tutorial online, there was an interruption and the phone became hard-bricked. That means, it wasn’t turning on anymore. Even when connected to the computer and a power outlet. Simply put, no sign of life on the phone. About 4 days later, the phone came back to life, I initiated the flashing process and Voila, infinix hot note X551 is fully back to life and functional.

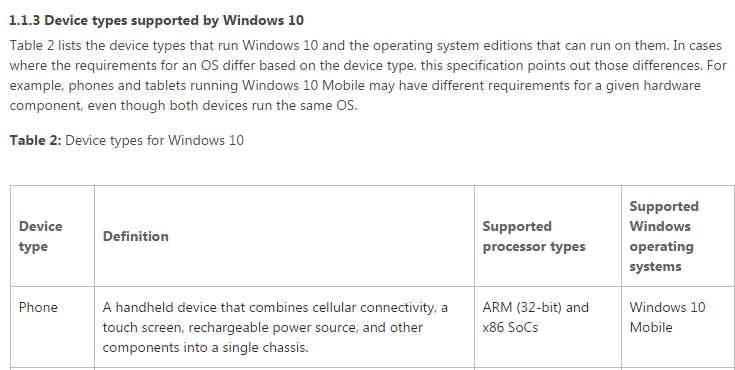
So, now that you know the story, let’s head-on to how I was able to fix it. This should aid you in case you encounter any issues with the infinix hot note or any other android phone running on MTK (MediaTek) processor.

Repairing Bricked Infinix Hot Note X551

Just before I lead you on the processes involved, let me state down the requirements. It’s best you have all of these in place before proceeding.

Requirements

  • A Computer
  • A working USB cable (preferably the one that came with your phone)
  • SP Flash tool. You can download Here.
  • Infinix Hot Note X551 Stock ROM. You can download HERE.
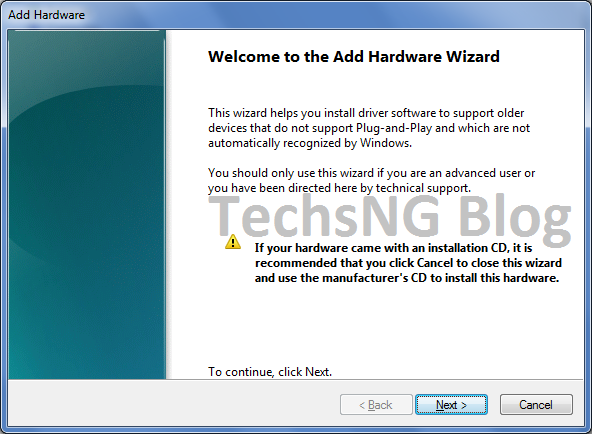
  • Manually Install VCOM drivers on the computer. You can download the VCOM drivers HERE.

Steps:
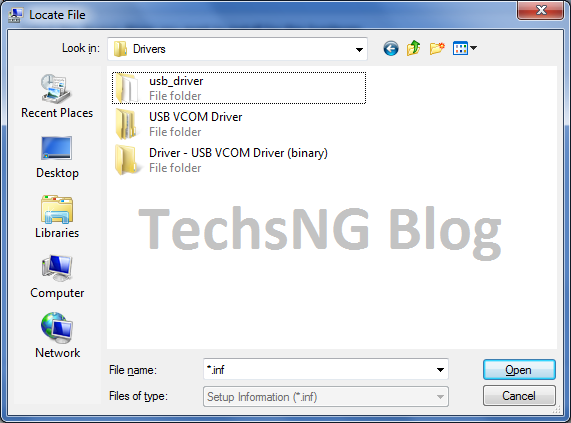
==> Using your computer, Unzip the SP flash tool files, the Stock ROM file as well as the MT6577 VCOM Driver files to a folder where you can easily remember on your computer. You can use WinZip software in unzipping the files.
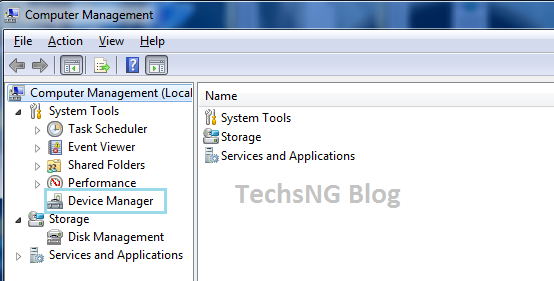
==> Make sure you install the right MT6577 drivers on your computer.
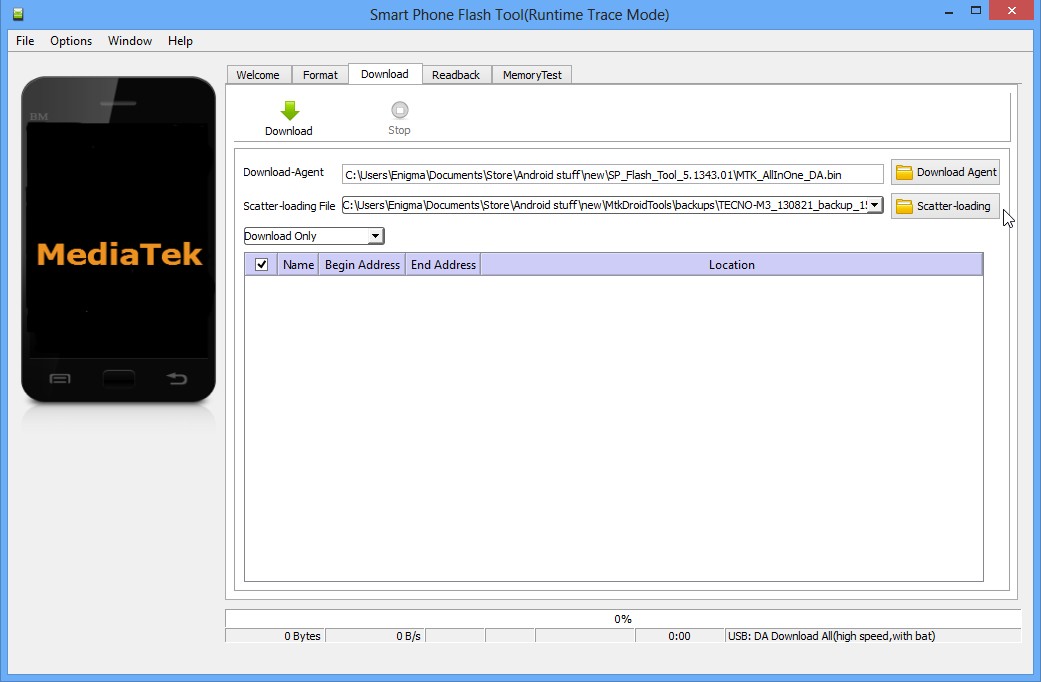
==> Now, navigate to the folder where you unzipped the SP flash tool files, right click on flash_tool.exe and choose to run as administrator.
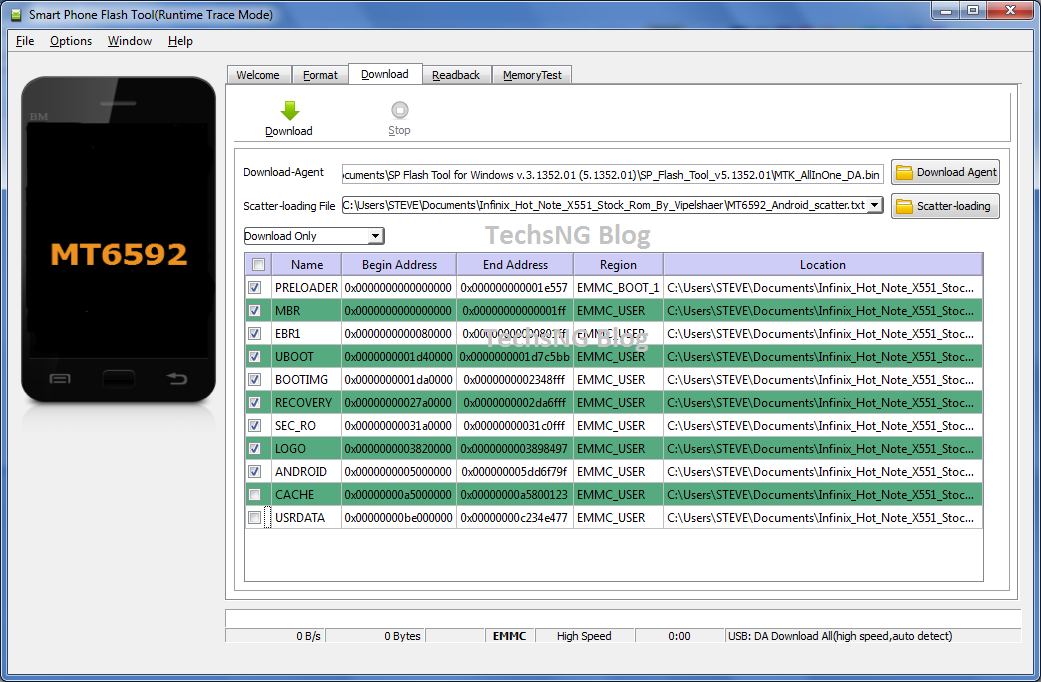
==> When launched, Click on the scatter loading option and navigate to the folder where you unzipped the Infinix hot note stock ROM into.

Using SP Flash tool in unbricking android phone

==> Under the Infinix hot not stock ROM folder, select the MT6592_Android_scatter.txt file.
==> Wait for it to load up. When it’s done loading, untick the CACHE and USERDATA options and click on Download.

repair bricked infinix hot note
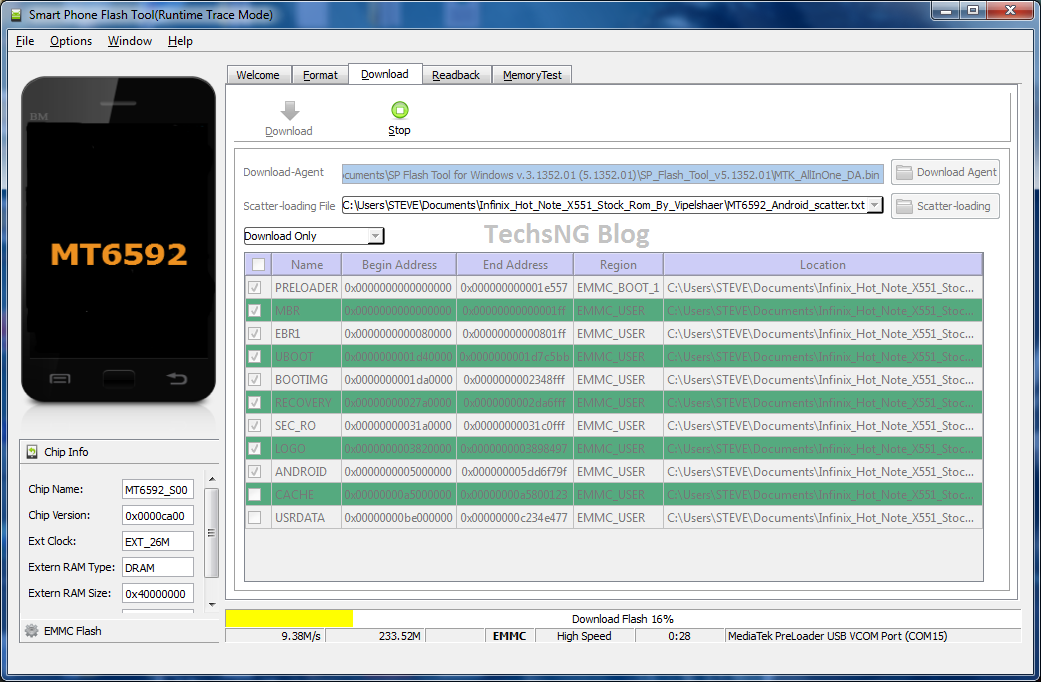
==> At this post, make sure your Infinix hot note phone is switched off then connect it to your computer using the USB cable.
==> The program will begin to count. Wait till the count is complete because any interruption whatsoever will make the phone hard-bricked.

repairing bricked infinix hot note x551 android phone

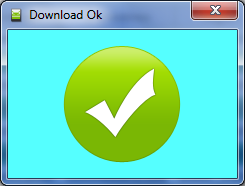
==> When the flashing is complete, you should get a blue box with a white check mark stating download OK.

flashed infinix hot note android phone

==> Click on the x button and close the SP flash tool program.
==> Disconnect your phone from the computer, leave it for like 10 to 20 seconds and then power it on.

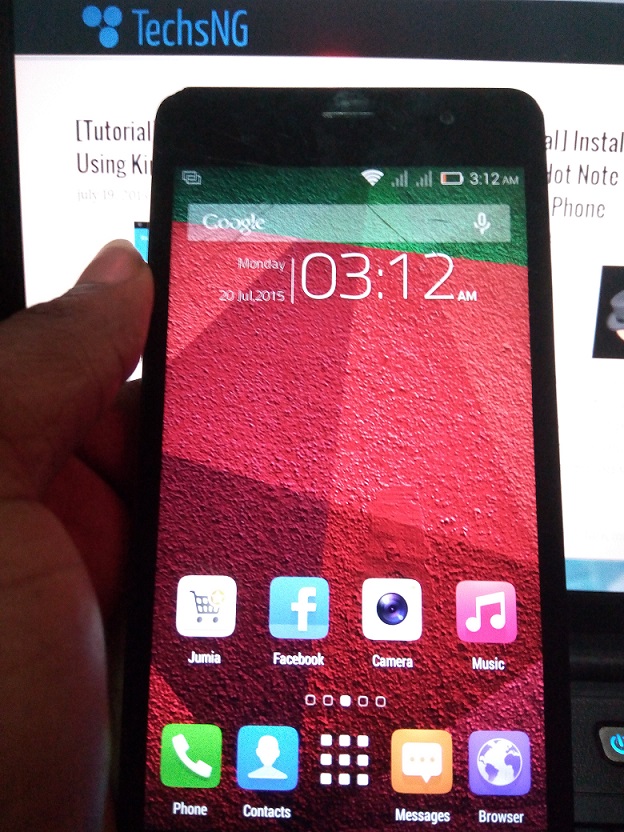
Since it’s a fresh stock ROM installation, the booting time will take much longer than usual. Don’t panic, your device is safe.

When the device boots to the start up options, I am sure by then, there should be a smile on your face because you have successfully unbricked your phone.

Unbricked infinix hot note android phone

Above is the picture of the Infinix hot note x551 successfully unbricked and everything is working perfectly fine so far.

If you have any questions or comment regarding unbricking a bricked phone, do ask your questions using the comment form and I will reply as soon as I can.

Source: www.techsng.com

How To Manually Install MediaTek (MT6577 USB) VCOM Drivers On Windows 7

Earlier before now, we talked on how to unbrick a bricked infinix hot note x551 phone. Not only did we write on that, images on the post proved that the method works. Following that post, we made mention of having to manually install MT6577 USB  VCOM drivers which can also be termed as MediaTek USB VCOM drivers.

Since we haven’t written on how that can be done, we decided to publish a post which entails the whole process and here on this post, we will be using windows 7 as a case study.

Manually Installing MediaTek USB VCOM Drivers On Windows 7

Just before we go into the tutorial proper, we’d like to make mention of the requirements. It is necessary you have all of this in place before proceeding with the tutorial.

Requirements:
  • A Computer running Windows 7
  • MediaTek USB VCOM drivers. You can download HERE.

Steps:
==> First and foremost, extract the downloaded driver into a folder on your computer where you can easily remember.
==> Right on your computer desktop screen, right click on Computer and click on Manage.
==> When on the manage window, click on Device Manager which is located at the left side of the page.

install MediaTek USB driver on windows 7
==> At this point, you should see some listings that includes your the name of your computer, batteries, computer, disk drives etc. Click on the name of your computer.
==> When you’ve clicked on the name of your computer, click on Actions and click on Add Legacy Hardware.
==> An hardware installation wizard will be displayed to you. Just click on Next.

Add hardware wizard on windows 7
==> On the next page, choose the second option which is ‘Install the hardware that i manually select from a list (Advanced)‘ and click on Next.
==> On the next page, click on Show All Devices and click On Next.
==> At this point, click on Have Disk and when the next pop up window shows up, click on Browse.
==> Navigate into the folder you had extract the MediaTek USB VCOM files into. Under the folder, choose the USB VCOM Driver folder.

usb vcom driver folder on windows 7
==> Under USB VCOM Driver, click on the folder for your operating system. In this case, we are using the Windows 7. If using windows 7 operating system, choose win7.
==> Under the win7 folder, choose the version your computer works with. If using 64bit     and click On Open then click on OK.
==> Click on Next and you the list of drivers that will be installed will be shown to you.

install mediatek driver on windows 7
==> Keep clicking on the Next option till the installation is complete and you get the finish button. Click on Finish and you are done.

There you have it. Installing the MediaTek drivers is pretty easy as we have outlined here and that should aid you in unbricking your android phone running on MTK (MediaTek) processor.

Source: http://www.techsng.com